What is CECV?

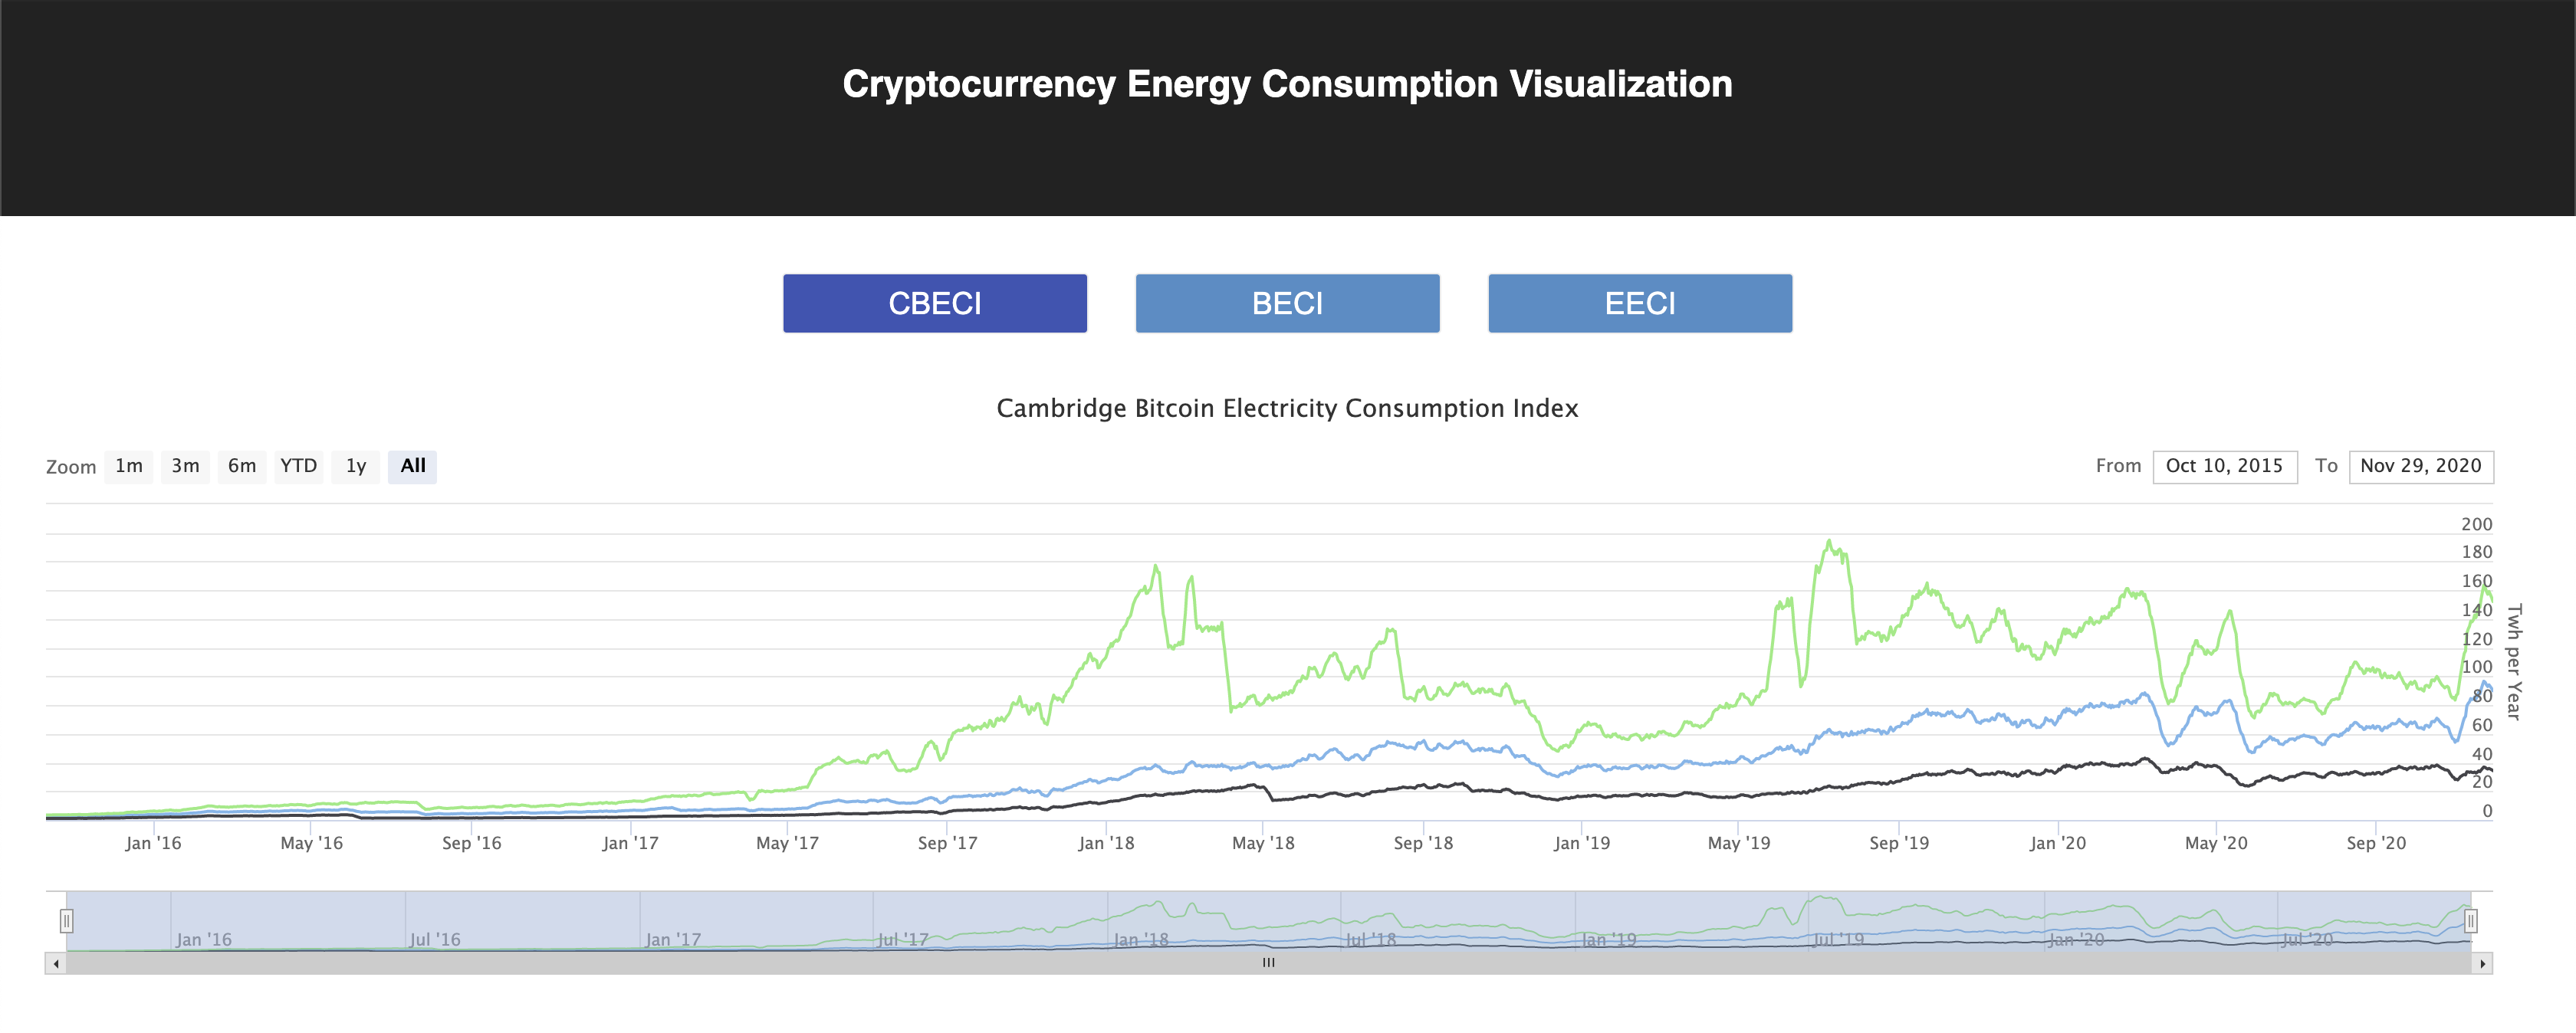
CECV is a web application to convert cryptocurrency energy consumption data into graphs and present them in a intuitive and interactive way. In CECV, we present two data sets including the BECI (Bitcoin Energy Consumption Index) and EECI (Ethereum Energy Consumption Index).

According to the BECI from Digiconomist, the peak value of the annual electricity consumption reached 77.782TWh, which is comparable to the power consumption of Chile. Besides, the generated annual carbon footprint is nearly 36.95 Mt of carbon dioxide, comparable to the carbon footprint of New Zealand. Moreover, the electricity consumption of a single transaction is 761.93 kWh, which is close to the energy consumption of 700,000 VISA payments and is equivalent to the 20-day average electricity consumption of American households, and the e-waste generated by each transaction is 101.10 grams.

As for the EECI, the annual total electrical energy consumption of Ethereum is 11.89 TWh, which is comparable to the power consumption of Uruguay, and the footprint per single transaction is 29.44 kWh, equivalent to the power consumption of an average U.S. household over 0.99 days.

How to run CECV?

  1. Download and Install the latest version of NodeJS

    The NodeJs official download link is here

  2. Download the latest version of CECV

    1
    $ git clone https://github.com/ChenHuangyin/CECV.git
  3. Get into the git repository folder and install the application dependencies

    1
    $ npm install
  4. Run the application locally

    1
    $ npm start

How is CECV built?

Leetcode 4. Median of Two Sorted Arrays

求两个已排序数组的中位数

1
2
3
4
5
6
7
8
9
10
11
12
13
14
15
16
17
18
19
20
21
22
23
24
25
26
27
28
29
30
31
32
33
34
35
36
37
38
39
40
41
42
43
func findMedianSortedArrays(nums1 []int, nums2 []int) float64 {
total_length := len(nums1) + len(nums2)
if total_length == 0 {
return 0
}
median_pos := (len(nums1) + len(nums2)) / 2
p1, p2, median_1, median_2, counter, tmp := 0, 0, 0, 0, 0, 0
var ans float64
for {
if p1 >= len(nums1) && p2 >= len(nums2) {
break
}
if p1 >= len(nums1) {
tmp = nums2[p2]
p2 += 1
} else if p2 >= len(nums2) {
tmp = nums1[p1]
p1 += 1
} else if nums1[p1] <= nums2[p2] {
tmp = nums1[p1]
p1 += 1
} else if nums1[p1] > nums2[p2] {
tmp = nums2[p2]
p2 += 1
}

if counter == (median_pos - 1) {
median_2 = tmp
}
if counter == median_pos {
median_1 = tmp
if total_length%2 == 0 {
ans = float64((median_1 + median_2)) / 2
break
} else {
ans = float64(median_1)
break
}
}
counter++
}
return ans
}

Leetcode 11. Container With Most Water

求解能装最多水的容器,体积等于两边缘的距离乘以较短边的长度。两个指针分列于左右

然后向中间搜索即可,计算每次所取容器的体积并更新历史最大值。

1
2
3
4
5
6
7
8
9
10
11
12
13
14
15
16
17
18
19
20
21
22
23
24
25
26
27
28
func min(A int, B int) int {
if A < B {
return A
} else {
return B
}
}

func maxArea(height []int) int {
size := len(height)
left, right := 0, size-1
max := 0
for {
if left >= right {
break
}
dis := min(height[left], height[right]) * (right - left)
if max < dis {
max = dis
}
if height[left] <= height[right] {
left += 1
} else if height[left] > height[right] {
right -= 1
}
}
return max
}

Leetcode 16. 3Sum Closest

暴力循环更新与target最近的搭配

1
2
3
4
5
6
7
8
9
10
11
12
13
14
15
16
17
18
19
20
21
22
23
24
25
26
27
28
29
func threeSumClosest(nums []int, target int) int {
sort.Ints(nums)
diff := math.MaxInt64
var l, r, val, dis, res int
for i := 0; i < len(nums)-2; i++ {
l = i + 1
r = len(nums) - 1
for {
if l >= r {
break
}
val = nums[i] + nums[l] + nums[r]
dis = int(math.Abs(float64(val - target)))
if dis == 0 {
return target
} else if diff > dis {
diff = dis
res = val
}

if val < target {
l++
} else {
r--
}
}
}
return res
}

Leetcode 18. 4Sum

​排序后,先确定两个数,然后从两边暴力搜索剩下两数即可。。。 时间复杂度为 O(n^3) ,可以做剪枝优化

1
2
3
4
5
6
7
8
9
10
11
12
13
14
15
16
17
18
19
20
21
22
23
24
25
26
27
28
29
30
31
32
33
34
35
36
37
38
39
40
41
42
43
44
45
46
47
48
49
50
51
52
53
54
55
56
57
58
59
60
61
62
63
64
65
66
67
68
func fourSum(nums []int, target int) [][]int {
ans := make([][]int, 0, 10)
if nums == nil || len(nums) < 4 {
return ans
}
sort.Ints(nums)
fmt.Println(nums)
for i := 0; i < len(nums); i++ {
if i > 0 && nums[i] == nums[i-1] {
continue
}
tmp := target - nums[i]
for j := i + 1; j < len(nums)-2; j++ {
if j > i+1 && nums[j] == nums[j-1] {
continue
}
tmp1 := tmp - nums[j]
left, right := j+1, len(nums)-1
for {
if left >= right {
break
}

if nums[left]+nums[right] == tmp1 {
ans = append(ans, []int{nums[i], nums[j], nums[left], nums[right]})
for {
left += 1
if left < right && nums[left] == nums[left-1] {
continue
} else {
break
}
}

for {
right -= 1
if left < right && nums[right] == nums[right+1] {
continue
} else {
break
}
}
} else if nums[left]+nums[right] < tmp1 {
for {
left += 1
if left < right && nums[left] == nums[left-1] {
continue
} else {
break
}
}
} else if nums[left]+nums[right] > tmp1 {
for {
right -= 1
if left < right && nums[right] == nums[right+1] {
continue
} else {
break
}
}
}

}

}
}
return ans
}

Leetcode 35. Search Insert Position

查找有序插入的位置,水题

1
2
3
4
5
6
7
8
9
10
func searchInsert(nums []int, target int) int {
for i := 0; i < len(nums); i++ {
if nums[i] == target || nums[i] > target {
return i
} else if nums[i] < target && i < len(nums) - 1 && nums[i+1] > target {
return i + 1
}
}
return len(nums)
}

Leetcode 41. First Missing Positive

Note: Your algorithm should run in O(n) time and uses constant extra space.

由于原题要求O(n)的时间复杂度,所以无法使用传统的排序算法,唯一能用的是桶排序。然而题目又要求常数级的空间复杂度,所以借助原数组空间,同时使用swap来实现桶排序即可。

1
2
3
4
5
6
7
8
9
10
11
12
13
func firstMissingPositive(nums []int) int {
for i := range nums {
for nums[i] > 0 && nums[i] <= len(nums) && nums[i] != nums[nums[i]-1] {
nums[nums[i]-1], nums[i] = nums[i], nums[nums[i]-1]
}
}
for i := range nums {
if nums[i] != i+1 {
return i + 1
}
}
return len(nums) + 1
}

Leetcode 45. Jump Game II

贪心算法。和Leetcode 55 同样是O(n)解法,唯一不同是要记录每一段的最大跳跃值tmp_MaxIndex,找出这一区间内的最大跳跃值作为下一区间的max_index,区间的数量就等于最优解的跳跃数

1
2
3
4
5
6
7
8
9
10
11
12
13
14
15
16
17
18
func jump(nums []int) int {
max_index := nums[0]
if len(nums) == 1 {
return 0
}
tmp_MaxIndex := max_index
jump_cnt := 0
for index, v := range nums {
if index+v > tmp_MaxIndex {
tmp_MaxIndex = index + v
}
if index == max_index || index == len(nums)-1 {
jump_cnt += 1
max_index = tmp_MaxIndex
}
}
return jump_cnt
}

Leetcode 55. Jump Game

O(n)解法,记录比较当前位置能去到的最远点,并更新所有目前已知点能去到的最远点。对每一个点都做这样的更新,看最后能否到达终点即可。

1
2
3
4
5
6
7
8
9
10
11
12
13
14
15
16
func canJump(nums []int) bool {
index := 0
max_index := nums[0]
for index <= max_index && index < len(nums) {
if index+nums[index] > max_index {
max_index = index + nums[index]
}
index += 1
}

if index == len(nums) {
return true
} else {
return false
}
}

Leetcode 59. Spiral Matrix II

漩涡数字矩形。打表题,判断行数列数,按螺旋形的顺序对位填入相应的数字即可。

1
2
3
4
5
6
7
8
9
10
11
12
13
14
15
16
17
18
19
20
21
22
23
24
25
26
27
28
29
30
31
32
33
34
func generateMatrix(n int) [][]int {
matrix := make([][]int, n)
for i := range matrix {
matrix[i] = make([]int, n)
}
if n <= 0 {
return matrix
}
index := 1
for i := 0; i < (n-1)/2+1; i++ {
row := i
col := i
for col < n-i { //右移
matrix[row][col] = index
index++
col++
}
col--
for row = i + 1; row < n-i; row++ { //下移
matrix[row][col] = index
index++
}
row--
for col = n - i - 2; col > i; col-- { //左移
matrix[row][col] = index
index++
}
for row = n - i - 1; row > i; row-- { //上移
matrix[row][col] = index
index++
}
}
return matrix
}

Leetcode 63. Unique Paths II

图寻路,只有向右以及向下两个方向。直接暴力DFS,超时!再看题,发现数据量为n,m <= 100,显然用不了搜索算法。路径数问题求解尝试用dp。从(0,0)出发,起点路径数首先置为1,遍历每个点,可达路径数 = 左邻点可达路径数 + 上邻点可达路径数,当然首行首列要做判断,如遇路障此点可达路径数直接置0

1
2
3
4
5
6
7
8
9
10
11
12
13
14
15
16
17
18
19
20
21
22
23
24
25
func uniquePathsWithObstacles(obstacleGrid [][]int) int {
if obstacleGrid == nil || obstacleGrid[0][0] == 1 {
return 0
}
route_matrix := make([][]int, len(obstacleGrid))
for i := range route_matrix {
route_matrix[i] = make([]int, len(obstacleGrid[0]))
}
for i := range obstacleGrid {
for j := range obstacleGrid[0] {
if i == 0 && j == 0 {
route_matrix[i][j] = 1
} else if obstacleGrid[i][j] == 1 {
route_matrix[i][j] = 0
} else if i == 0 {
route_matrix[i][j] = route_matrix[i][j-1]
} else if j == 0 {
route_matrix[i][j] = route_matrix[i-1][j]
} else {
route_matrix[i][j] = route_matrix[i][j-1] + route_matrix[i-1][j]
}
}
}
return route_matrix[len(obstacleGrid)-1][len(obstacleGrid[0])-1]
}

Leetcode 64. Minimum Path Sum

与63一样,直接dp求解,dp[i][j] = min(dp[i-1][j], dp[i][j-1]) + grid[i][j]

1
2
3
4
5
6
7
8
9
10
11
12
13
14
15
16
17
18
19
20
21
22
23
24
25
26
27
28
29
30
31
32
33
34
func min_int(A int, B int) int {
if A > B {
return B
} else {
return A
}
}

func minPathSum(grid [][]int) int {
if grid == nil {
return 0
}
matrix := make([][]int, len(grid))
for i := range matrix {
matrix[i] = make([]int, len(grid[0]))
for j := range matrix[i] {
matrix[i][j] = math.MaxInt64
}
}
for i := range grid {
for j := range grid[i] {
if i == 0 && j == 0 {
matrix[i][j] = grid[i][j]
} else if i == 0 {
matrix[i][j] = matrix[i][j-1] + grid[i][j]
} else if j == 0 {
matrix[i][j] = matrix[i-1][j] + grid[i][j]
} else {
matrix[i][j] = min_int(matrix[i-1][j], matrix[i][j-1]) + grid[i][j]
}
}
}
return matrix[len(grid)-1][len(grid[0])-1]
}

Leetcode 66. Plus One

高精度加法

1
2
3
4
5
6
7
8
9
10
11
12
13
14
15
16
17
18
func plusOne(digits []int) []int {
len := len(digits)
res := 0
for i := len - 1; i >= 0; i-- {
if i == len-1 {
digits[i] += (res + 1)
} else {
digits[i] += res
}
res = digits[i] / 10
digits[i] %= 10
}
if res != 0 {
return append([]int{res}, digits...)
} else {
return digits
}
}

Leetcode 73. Set Matrix Zeroes

要求用常数的额外空间,即只能在原存储数组中进行操作,不能开辟任意的额外空间。所以先对首行首列进行判断,判断之后利用首行首列的空间来存储对应行列的置零情况。

1
2
3
4
5
6
7
8
9
10
11
12
13
14
15
16
17
18
19
20
21
22
23
24
25
26
27
28
29
30
31
32
33
34
35
36
37
38
39
40
41
42
43
44
45
46
47
48
49
50
51
52
53
func setZeroes(matrix [][]int) {
var first_row, first_col bool = false, false

//首行首列判断
for i := range matrix {
if matrix[i][0] == 0 {
first_col = true
}
}
for j := range matrix[0] {
if matrix[0][j] == 0 {
first_row = true
}
}

//判断值存储
for i := range matrix {
for j := range matrix[0] {
if matrix[i][j] == 0 && i != 0 && j != 0 {
matrix[i][0] = 0
matrix[0][j] = 0
}
}
}

//非首行首列赋值
for i := range matrix {
if matrix[i][0] == 0 && i != 0 {
for j := range matrix[0] {
matrix[i][j] = 0
}
}
}
for j := range matrix[0] {
if matrix[0][j] == 0 && j != 0 {
for i := range matrix {
matrix[i][j] = 0
}
}
}

//首行首列赋值
if first_row {
for j := range matrix[0] {
matrix[0][j] = 0
}
}
if first_col {
for i := range matrix {
matrix[i][0] = 0
}
}
}

Leetcode 74. Search a 2D Matrix

由于是排好序的,直接检索行首行末从而确定当前行的范围,在范围内才进行搜索。时间复杂度为o(m+n)也可通过,麻烦一点的话可以用二分法来检索,时间复杂度为o(logm + logn)

1
2
3
4
5
6
7
8
9
10
11
12
13
14
15
16
func searchMatrix(matrix [][]int, target int) bool {
if len(matrix) == 0 || len(matrix[0]) == 0 {
return false
}
for i := range matrix {
if matrix[i][0] <= target && matrix[i][len(matrix[0])-1] >= target {
for j := range matrix[0] {
if matrix[i][j] == target {
return true
}
}
return false
}
}
return false
}

Leetcode 78. Subsets

经典子集问题,DFS遍历即可。

1
2
3
4
5
6
7
8
9
10
11
12
13
14
15
16
17
18
19
20
21
22
23
24
25
26
27
28
29
30
31
32
var ans [][]int

func subsets(nums []int) [][]int {
if len(nums) == 0 {
return ans
}
ans = make([][]int, 0)
path := []int{}
tmp_path := []int{}
copy(tmp_path, path)
ans = append(ans, tmp_path)
dfs(nums, 0, path)
return ans
}

func dfs(nums []int, pos int, path []int) {
if pos == len(nums) {
return
}
for i := pos; i < len(nums); i++ {
var t int = nums[i]
path = append(path, t)

tmp_path := make([]int, len(path))
copy(tmp_path, path)
ans = append(ans, tmp_path)

dfs(nums, i+1, path)

path = path[:len(path)-1]
}
}

环境配置

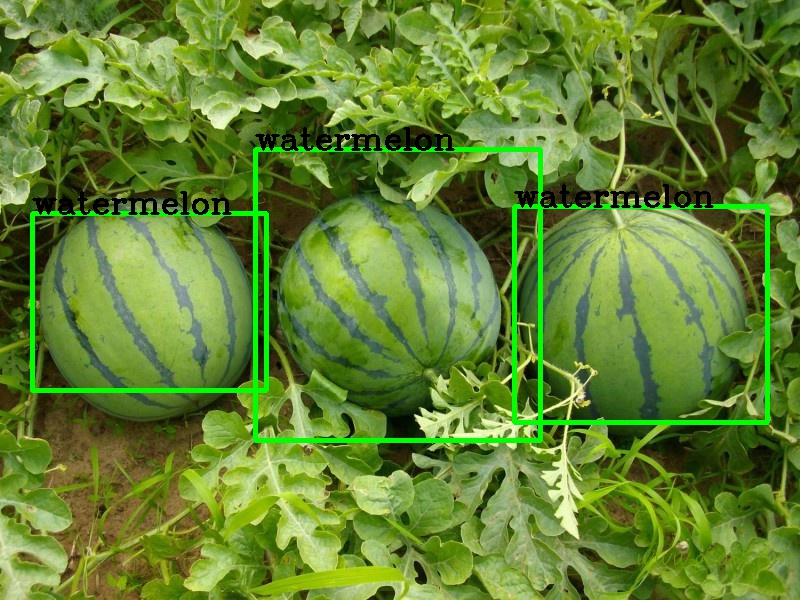
本模型训练的环境为: Linux 3.10 + Python 3.5.2 + Tensorflow-gpu 1.4.0 + Darkflow + CUDA 8.0 + CUDNN 6.0 + Opencv 3.4.1

  1. 安装Opencv

    1
    2
    3
    4
    5
    6
    7
    8
    9
    10
    11
    $ sudo pip3 install opencv-python

    #验证安装
    [squarepants@root ~]$ python3
    Python 3.5.2 (default, Jun 5 2018, 03:54:30)
    [GCC 4.8.5 20150623 (Red Hat 4.8.5-16)] on linux
    Type "help", "copyright", "credits" or "license" for more information.
    >>> import cv2
    >>> cv2.__version__
    '3.4.1'
    >>>
  2. 安装CUDA 8.0 + CUDNN 6.0

    首先先安装CUDA 8.0,去Nvidia官网下载对应系统及版本的在线deb包。例如在Ubuntu14.04下, 下载完成后:

    1
    2
    3
    $ sudo dpkg -i cuda-repo-ubuntu1404_8.0.44-1_amd64.deb
    $ sudo apt-get update
    $ sudo apt-get install cuda

    安装CUDNN,同样去Nvidia官网(这个需要注册以及填一个问卷)将runtime, developer, sample三个包都下载下来:

    1
    2
    3
    $ sudo dpkg -i libcudnn6-doc_6.0.21-1+cuda8.0_amd64.deb
    $ sudo dpkg -i libcudnn6-dev_6.0.21-1+cuda8.0_amd64.deb
    $ sudo dpkg -i libcudnn6_6.0.21-1+cuda8.0_amd64.deb
  3. 安装tensorflow

    1
    2
    3
    4
    5
    6
    7
    8
    9
    10
    11
    12
    13
    14
    15
    16
    17
    18
    19
    20
    21
    22
    23
    24
    25
    26
    27
    28
    29
    30
    31
    32
    33
    $ sudo pip3 install tensorflow-gpu==1.4

    #验证安装
    [squarepants@root ~]$ python3
    Python 3.5.2 (default, Jun 5 2018, 03:54:30)
    [GCC 4.8.5 20150623 (Red Hat 4.8.5-16)] on linux
    Type "help", "copyright", "credits" or "license" for more information.
    >>> import tensorflow as tf
    >>> hello = tf.constant("Hello,world!")
    >>> sess = tf.Session()
    2018-07-12 15:44:48.318820: I T:\src\github\tensorflow\tensorflow\core\platform\
    cpu_feature_guard.cc:140] Your CPU supports instructions that this TensorFlow bi
    nary was not compiled to use: AVX2
    2018-07-12 15:44:48.704842: I T:\src\github\tensorflow\tensorflow\core\common_ru
    ntime\gpu\gpu_device.cc:1356] Found device 0 with properties:
    name: GeForce GTX 970M major: 5 minor: 2 memoryClockRate(GHz): 1.038
    pciBusID: 0000:01:00.0
    totalMemory: 3.00GiB freeMemory: 2.87GiB
    2018-07-12 15:44:48.704842: I T:\src\github\tensorflow\tensorflow\core\common_ru
    ntime\gpu\gpu_device.cc:1435] Adding visible gpu devices: 0
    2018-07-12 15:44:49.009860: I T:\src\github\tensorflow\tensorflow\core\common_ru
    ntime\gpu\gpu_device.cc:923] Device interconnect StreamExecutor with strength 1
    edge matrix:
    2018-07-12 15:44:49.010860: I T:\src\github\tensorflow\tensorflow\core\common_ru
    ntime\gpu\gpu_device.cc:929] 0
    2018-07-12 15:44:49.010860: I T:\src\github\tensorflow\tensorflow\core\common_ru
    ntime\gpu\gpu_device.cc:942] 0: N
    2018-07-12 15:44:49.010860: I T:\src\github\tensorflow\tensorflow\core\common_ru
    ntime\gpu\gpu_device.cc:1053] Created TensorFlow device (/job:localhost/replica:
    0/task:0/device:GPU:0 with 2589 MB memory) -> physical GPU (device: 0, name: GeF
    orce GTX 970M, pci bus id: 0000:01:00.0, compute capability: 5.2)
    >>> print(sess.run(hello))
    b'Hello,world!'
  4. 安装Darkflow

    1
    2
    3
    $ sudo git clone https://github.com/thtrieu/darkflow.git
    $ cd darkflow
    $ sudo pip3 install -e .

VOC训练集生成

  1. 图片抓取:直接抓取自百度图片对应关键词下的图片,然后再进行手动筛选,去除模糊不清或是内容无关的图片。

  1. 目标标记标记XML文件的生成

利用Darkflow训练模型

  1. Yolo官网下载Yolov2的神经网络模型以及预生成的网络权重(本模型使用的是yolov2-tiny-voc)

  2. 训练之前先调整yolov2输入层的参数

    1
    2
    3
    4
    5
    6
    7
    8
    9
    10
    11
    12
    13
    14
    15
    16
    17
    18
    19
    20
    21
    22
    23
    24
    25
    26
    27
    28
    29
    $ cd darkflow-master
    $ sudo vim /cfg/yolov2-tiny-voc.cfg

    #拉到最下面找到region以及第一个卷积层的参数
    [convolutional]
    size=1
    stride=1
    pad=1
    filters=125 #输入层与第一个卷积层连接的filters = 5*(class数量 + 5)= 5 * 13 = 65,应改成65
    activation=linear

    [region]
    anchors = 1.08,1.19, 3.42,4.41, 6.63,11.38, 9.42,5.11, 16.62,10.52
    bias_match=1
    classes=20 #本模型一共八个标签,所以应修改为8
    coords=4
    num=5
    softmax=1
    jitter=.2
    rescore=1

    object_scale=5
    noobject_scale=1
    class_scale=1
    coord_scale=1

    absolute=1
    thresh = .6
    random=1
  3. 执行训练

    1
    2
    $ cd darkflow-master
    $ python flow --model cfg/yolov2-tiny-voc-8c.cfg --load bin/yolov2-tiny-voc.weights --train --annotation 8C_ModelData/annotations --dataset 8C_ModelData/images --gpu 0.8 --epoch 1200

模型预测结果


环境搭建参考自博客,博主是在centos下进行的环境配置。本文中采用的为内核版本4.2.0-27-generic的14.04.1-Ubuntu,需要安装Docker、Docker-compose以及Go语言环境,通过直接clone在线的Fabric Docker镜像,然后使用Docker-compose来启动各个节点。

安装前的准备

  1. 安装proxychains:便于直接下载国外的资源,出现连接超时的情况下非常实用,需要搭配使用海外的VPS

    1
    $ sudo apt-get install proxychains

    安装后进行配置:

    1
    $ sudo vim /etc/proxychains.conf

    在ProxyList后面加入代理的地址和端口即可

    测试结果:

    1
    2
    3
    4
    5
    6
    7
    8
    9
    10
    11
    12
    13
    14
    15
    16
    squarepants@root:~$ proxychains wget https://www.google.com
    ProxyChains-3.1 (http://proxychains.sf.net)
    --2018-07-11 17:08:09-- https://www.google.com/
    Resolving www.google.com (www.google.com)... |DNS-request| www.google.com
    |S-chain|-<>-67.218.146.81:9910-<><>-4.2.2.2:53-<><>-OK
    |DNS-response| www.google.com is 74.125.136.106
    74.125.136.106
    Connecting to www.google.com (www.google.com)|74.125.136.106|:443... |S-chain|-<>-67.218.146.81:9910-<><>-74.125.136.106:443-<><>-OK
    connected.
    HTTP request sent, awaiting response... 200 OK
    Length: unspecified [text/html]
    Saving to: ‘index.html.1’

    [ <=> ] 10,799 --.-K/s in 0.04s

    2018-07-11 17:08:11 (238 KB/s) - ‘index.html.1’ saved [10799]

安装Golang环境


  1. 参照Go官方下载网址(须翻墙),找到对应Linux版本的最新golang语言包下载地址

    1
    $ proxychains curl -O https://dl.google.com/go/go1.10.3.linux-amd64.tar.gz
  2. 将下载好的Golang包解压至/usr/local目录下

    1
    $ sudo tar -C /usr/local -xzf go1.10.3.linux-amd64.tar.gz
  3. 配置Go的系统环境变量

    1
    2
    3
    4
    5
    6
    7
    8
    9
    $ cd /etc
    $ sudo vim profile

    #在profile文末加入
    export PATH=$PATH:/usr/local/go/bin
    export GOPATH=/opt/gopath

    #加入并保存好后执行
    $ source profile
  4. 配置后可以查看到go的版本信息

    1
    2
    squarepants@root:~$ go version
    go version go1.10.3 linux/amd64

安装Docker


安装步骤参考自Docker官网

  1. 卸载旧版本的Docker(如果你的系统之前有安装过Docker)

    1
    $ sudo apt-get remove docker docker-engine docker.io
  2. 安装存储驱动程序(按官网的意思仅Ubuntu 14.04需要,因为16.04或以上版本Ubuntu的Linux内核自带overlay2驱动)

    1
    2
    3
    $ sudo apt-get update
    $ sudo apt-get install linux-image-extra-$(uname -r) linux-image-extra-virtual
    #若下载速度过慢可用镜像源或者调用Proxychains
  3. 使用公有的repository来安装Docker CE

    1
    2
    3
    4
    5
    6
    7
    $ sudo apt-get update

    #使得apt-get可以使用来自HTTPS的包
    $ sudo apt-get install apt-transport-https ca-certificates curl software-properties-common

    #添加Docker官方的GPG KEY(须翻墙)
    $ sudo proxychains curl -fsSL https://download.docker.com/linux/ubuntu/gpg | sudo apt-key add -

    验证GPG KEY的fingerprint 是否为 9DC8 5822 9FC7 DD38 854A E2D8 8D81 803C 0EBF CD88

    1
    2
    3
    4
    5
    6
    7
    $ sudo apt-key fingerprint 0EBFCD88

    #若添加成功结果应该如下:
    pub 4096R/0EBFCD88 2017-02-22
    Key fingerprint = 9DC8 5822 9FC7 DD38 854A E2D8 8D81 803C 0EBF CD88
    uid Docker Release (CE deb) <docker@docker.com>
    sub 4096R/F273FCD8 2017-02-22

    成功后添加Docker库到apt-repository中,并更新apt-get

    1
    2
    3
    $ sudo add-apt-repository "deb [arch=amd64] https://download.docker.com/linux/ubuntu \
    $(lsb_release -cs) stable"
    $ sudo apt-get update

    安装Docker-ce (须翻墙)

    1
    $ sudo proxychains apt-get install docker-ce

    4.检测Docker-CE是否成功安装

    1
    2
    3
    4
    5
    6
    7
    8
    9
    10
    11
    12
    13
    14
    15
    16
    17
    18
    19
    20
    21
    22
    23
    $ sudo docker version

    #结果为:
    squarepants@root:~$ sudo docker version
    Client:
    Version: 18.03.1-ce
    API version: 1.37
    Go version: go1.9.5
    Git commit: 9ee9f40
    Built: Thu Apr 26 07:18:46 2018
    OS/Arch: linux/amd64
    Experimental: false
    Orchestrator: swarm

    Server:
    Engine:
    Version: 18.03.1-ce
    API version: 1.37 (minimum version 1.12)
    Go version: go1.9.5
    Git commit: 9ee9f40
    Built: Thu Apr 26 07:16:59 2018
    OS/Arch: linux/amd64
    Experimental: false

    运行hello-world:

    1
    2
    3
    4
    5
    6
    7
    8
    9
    10
    11
    12
    13
    14
    15
    16
    17
    18
    19
    20
    21
    22
    squarepants@root:~$ sudo docker run hello-world

    Hello from Docker!
    This message shows that your installation appears to be working correctly.

    To generate this message, Docker took the following steps:
    1. The Docker client contacted the Docker daemon.
    2. The Docker daemon pulled the "hello-world" image from the Docker Hub.
    (amd64)
    3. The Docker daemon created a new container from that image which runs the
    executable that produces the output you are currently reading.
    4. The Docker daemon streamed that output to the Docker client, which sent it
    to your terminal.

    To try something more ambitious, you can run an Ubuntu container with:
    $ docker run -it ubuntu bash

    Share images, automate workflows, and more with a free Docker ID:
    https://hub.docker.com/

    For more examples and ideas, visit:
    https://docs.docker.com/engine/userguide/

安装Docker-Compose


安装步骤参考自Docker官网中的Docker-Compose安装指南

  1. 从github中将release的docker-compose下载至/usr/local/bin目录中

    1
    $ sudo curl -L https://github.com/docker/compose/releases/download/1.21.2/docker-compose-$(uname -s)-$(uname -m) -o /usr/local/bin/docker-compose
  2. 赋予Docker-Compose 可执行的权限

    1
    $ sudo chmod +x /usr/local/bin/docker-compose
  3. 查看Docker-Compose版本

    1
    2
    squarepants@root:~$ docker-compose --version
    docker-compose version 1.21.2, build a133471

Abstract

一种单纯以P2P方式构成的电子货币,可以使得在线支付不经过金融机构,直接进行端对端的交易。数字签名为这种交易方式的实现提供了一部分的基础,但是问题依然存在—如果仍然使用第三方金融机构来避免货币的双花,那么P2P的意义就不存在了。据此,我们设计了一种P2P网络来解决双花问题。这个网络利用Hash将CPU计算量作为标签,纳入了交易记录的时间戳,如果要改变这样一个交易记录需要重新花费大量的CPU计算量,否则无法被改变。这样的话,只要网络中大部分的CPU算力没有被攻击者所掌控,就会识别并使用最长的链,生成区块的速度永远会大于攻击者,攻击者就无法得逞。网络本身需求最小的结构,消息会被最为广泛地传播,节点可以随时离开以及重新加入网络,可以重新获取他们离线之后的最长链。

Introduction

当代的互联网金融几乎都依赖于金融机构,这些金融机构作为被授信的第三方参与电子支付。尽管对于绝大多数的交易来说,这一类的系统足够了,但是不可否认的是,它依然受限于这种固有的信任模型。这些第三方的金融机构会无法避免地参与到一些交易纠纷的调解当中,所以在这个基础上,想要当中的交易决不可逆是不可能的。金融机构作为调解者的角色会增加交易的成本,因此他们往往需要限制最小的交易金额从而减少小额交易的数量。实现不可逆交易以及提供不可逆服务是以失去这些功能为代价的。如果要保存着可逆性,我们需要信用作为评估传递,商户需要骚扰客户,从而了解他们所需的信用评估信息。当然,这种方法也无法完全避免骗子的存在,除非采用人与人之间现金交易的方法。可惜的是,当前的网络交易无法离开这样的一种信任机制。

我们需要的是一个用密码学原理来保障的电子支付系统,而不是传统的信任机制。这种电子支付系统允许端对端的直接交易,不需要第三方的信用机构。交易的不可逆性将保护商户免遭欺诈,而且可以轻易的实施例行托管机制来保护买家。在这篇文章中,提出了实现一种基于分布式P2P时间戳服务器,确保交易先后顺序,从而解决双花问题的方案。只要正常的节点控制着比攻击者更多的CPU算力,那么这个系统就是安全可靠的。

Transactions

我们定义了一种类似一条数字签名链的电子货币。每一个货币的转出者通过在交易底部的数字签名来实现交易,这个数字签名包含前一笔交易的Hash以及接收者的公钥。接收者可以通过发送者的公钥来检验发送者的真实身份。这种方式下,接收者显然无法检验是否存在货币双花的情况。传统情况下,在每笔交易之后,货币必须返回到货币发行机构的手中才能鉴别真伪,并判断是否有双发的情况发生。